
Mailcow , is a complete Email server, which we like to point out, has a very active community, updates, news and fixes almost daily.
At HelpSysAdmin we have several clients that use Mailcow to host email services for their clients’ numerous domains.
Mailcow uses Anti Spam Rspamd with dozens of rules and plugins installed and pre-configured; after a few tweaks, customers really feel the difference from other not so good anti spam solutions.
The Anti virus used is ClamAV which has great advantages, such as the installation of additional signatures Anti Virus, Anti Phishing, Anti Malware and others as we discussed in another post , to summarize, the Webmail used is SOGo Groupware which has much more than Send email function.
HelpSysAdmin offers the service of installation, configuration, optimization, support for 7 days after installation for any feature or configuration, as well as MailCow improvements for (R$ 80.00) .
Next, we’ll cover Mailcow’s default installation and configuration .
Preparations before installing Mailcow
Before starting the installation, you need to make some preparations regarding the DNS of the domain you want to use as the main one in Mailcow.
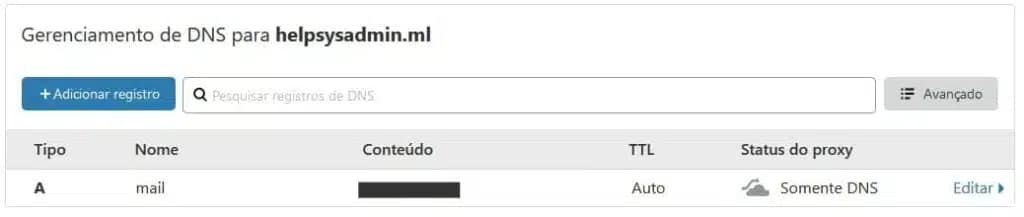
For the purpose of example and easy understanding we will use a domain that we use for tests, helpsysadmin.ml . For DNS management, we will use Cloudflare, to exemplify filling in the DNS entries that will be needed. If you prefer, use your domain’s host DNS manager.
Mailcow is compatible with Ubuntu 18 and 20. We are going to use Ubuntu 20. Mailcow needs a subdomain that will be the URL for accessing the panels and necessary for configuring the Mail client (you can create others later). This subdomain must be the hostname of your server and have the reverse configured with your Data Center.
Let’s use mail.helpsysadmin.ml
1 – Update your Ubuntu server and restart
apt update; apt upgrade -y;
2 – Access the Shell and Configure the Hostname of your server
hostnamectl set-hostname mail.helpsysadmin.ml
3 – Set the server’s Time Zone to America/Sao_Paulo
timedatectl set-timezone America/Sao_Paulo
4 – Access your DNS Manager and create an entry of type A with name mail, pointing to the IP of your server. Here we are going to use CloudFlare
5 – With the entry created, now it’s time to change the reverse IP (rDNS) to your hostname ( mail.helpsysadmin.ml ). You can make this change with your Data Center or VPS provider.
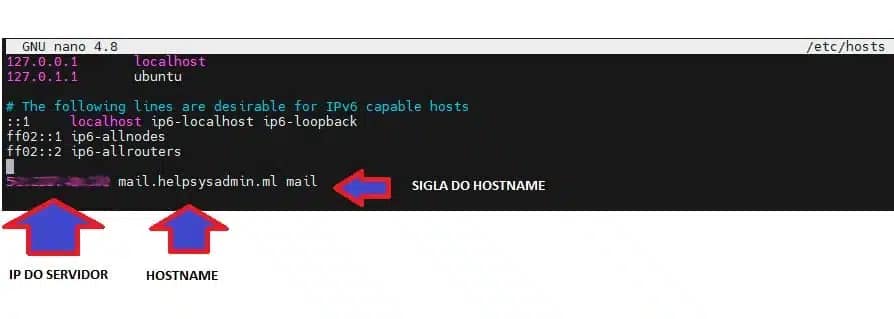
6 – Add the IP and hostname in hosts
nano /etc/hosts
Creating SWAP for the Server
If you still don’t have SWAP created on your server, follow the steps below. Let’s create a 4GB SWAP file.
1 – create the file for swap, change permissions and enable swap
dd if=/dev/zero of=/swapfile count=4096 bs=1MiB
chmod 600 /swapfile
mkswap /swapfile
swapon /swapfile
2 – confirm that swap was created correctly
free -m
3 – edit /etc/fstab file and add
/swapfile swap swap sw 0 0
Installing docker and docker-compose
1 – Install Docker , enable and start
curl -sSL https://get.docker.com/ | CHANNEL=stable sh
systemctl enable docker.service
systemctl start docker.service
2 – Install docker-compose
curl -L https://github.com/docker/compose/releases/download/$(curl -Ls https://www.servercow.de/docker-compose/latest.php)/docker-compose-$(uname -s)-$(uname -m) > /usr/local/bin/docker-compose
chmod +x /usr/local/bin/docker-compose
Installing Mailcow
1 – Install git
apt install git -y
2 – Downloading Mailcow
cd /opt
git clone https://github.com/mailcow/mailcow-dockerized
cd mailcow-dockerized
3 – Generating the configuration file. Remember to enter your hostname when asking for your FQDN
./generate_config.sh
4 – Change the configuration if you need to
nano mailcow.conf
5 – Extract the images and run the docker file
docker-compose pull
docker-compose up -d
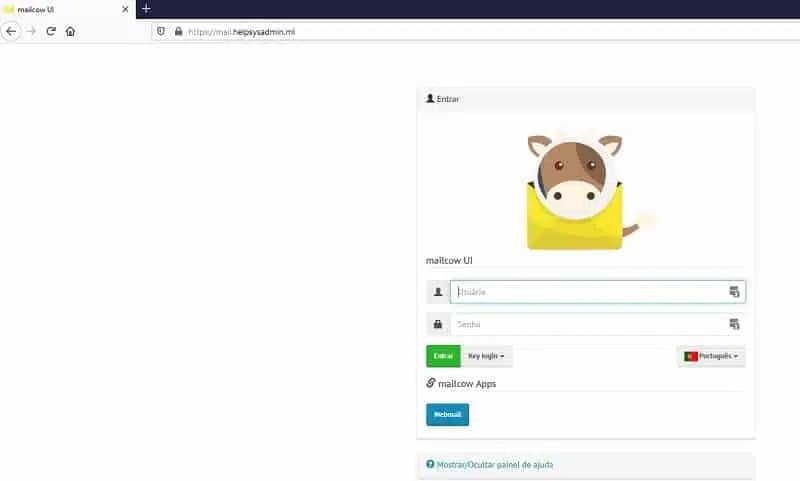
6 – Access Mailcow and change the admin password
https://yourhostname/admin
User: admin
Password: moohoo
7 – Changing the admin password as soon as possible
Configuring MailCow
In this part, the most important thing is to configure the NS entries for the hostname you have chosen.
Let’s continue using CloudFlare, which is where our domain is pointed.
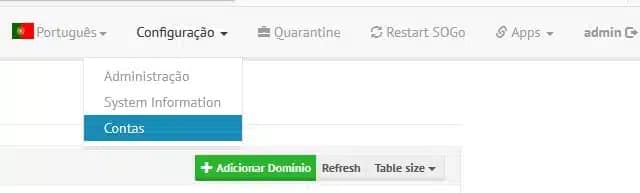
1 – Continuing on the Mailcow dashboard, Logged in as admin, click Configuration >> Accounts, then click Add Domain.
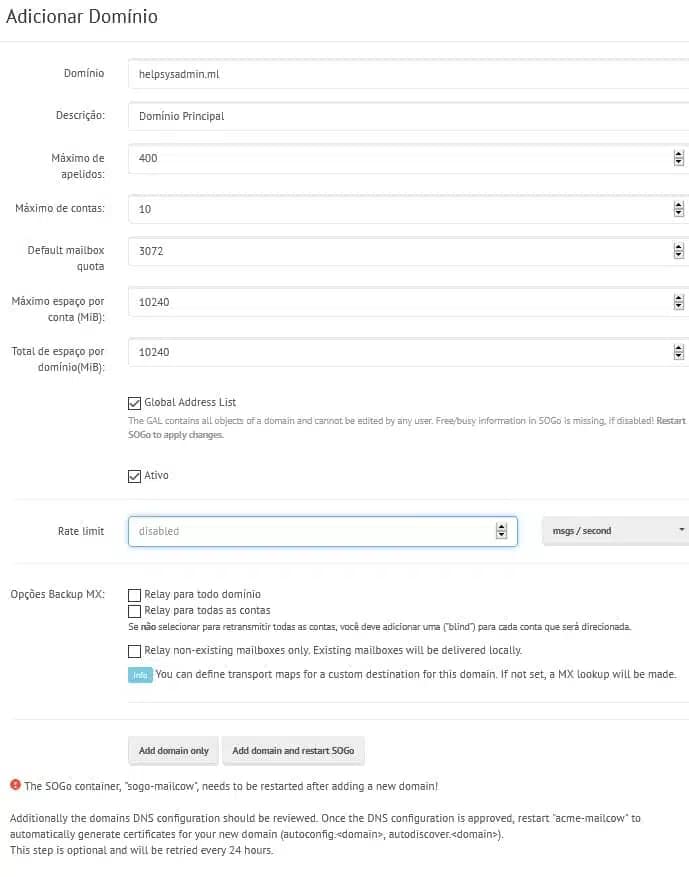
2 – On this screen, enter your main domain and adjust the limits for your account. At the end click on ” Add domain and restart SOGo “
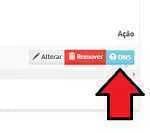
3 – The account you just created will be listed as shown below. Click on the DNS icon
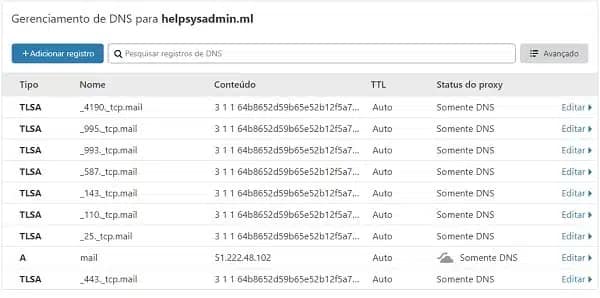
4 – This part is very important and you won’t need to configure it every time you host a new domain. To fill in we will use our domain that is in CloudFlare . Obviously the green one is OK. What is in red X we need to create in cloudflare. See the image below:
Note: the first two entries that are in green inform you that you created the rDNS reverse IP correctly (we covered this topic at the beginning of this text)
5 – Creating NS entries in CloudFlare, one by one
Note: note that we are now going to create entries for mail and no longer for the root of the domain:
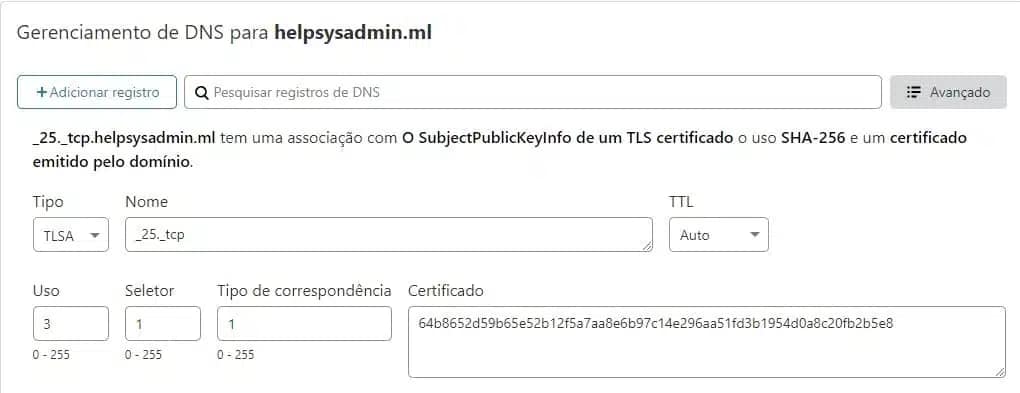
6 – Below is an example of how to create a TLSA entry. Execute the same according to the table above
7 – After filling all the TLSA entries the result will be this:
8 – Finalizing the main domain settings
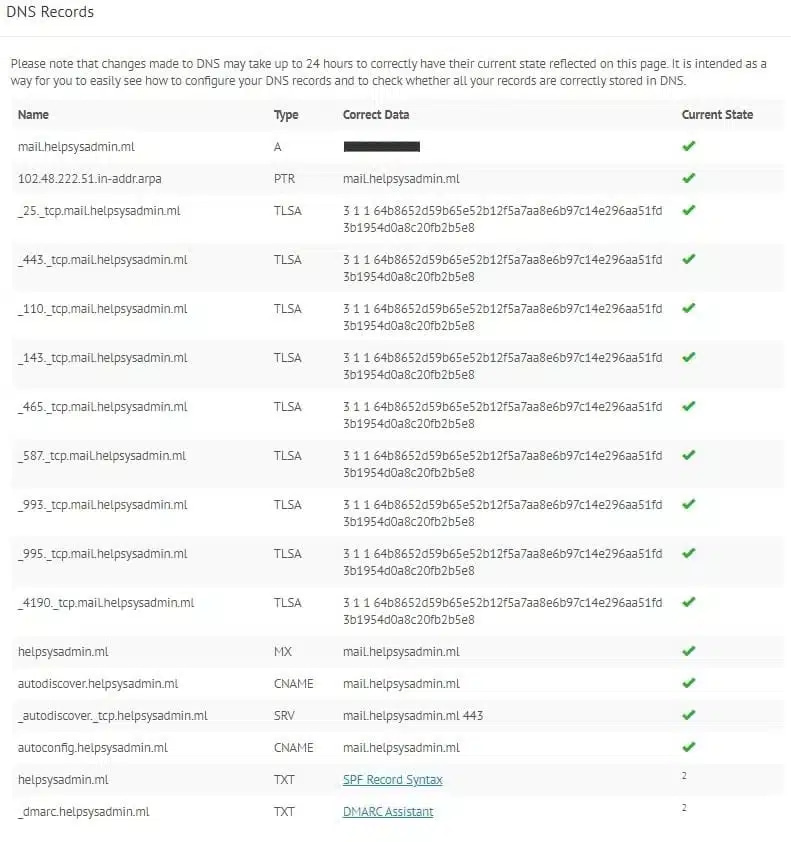
As we could see in the table of item 4, some essential entries are still missing for the MailCow configuration. Let’s go to them:
– MX entries are DNS information that declares and directs mail services to the correct mail server.

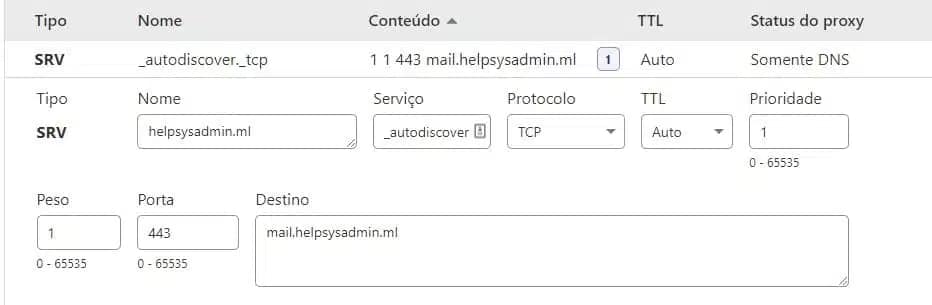
– SRV input
Ready! Let’s check that everything is ok now, to finally host email accounts, domains etc…
9 – As you did in option 3 click on the DNS button and wait. Expected result is “green” for everything except SPF and DKIM which we haven’t configured yet
9 – Finishing with the DKIM and SPF configuration
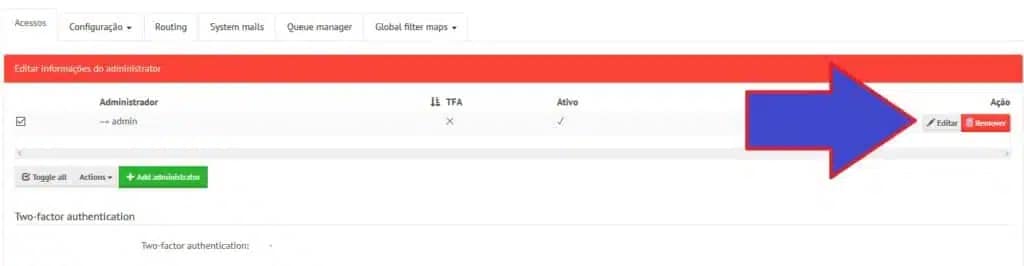
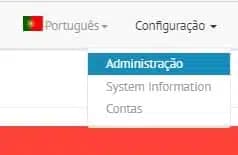
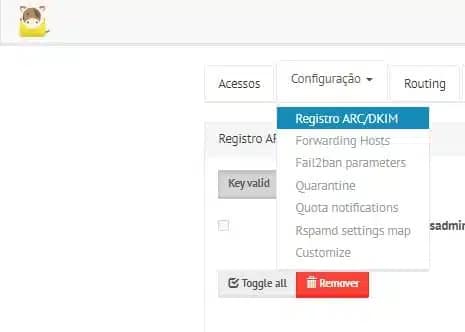
In the MailCow Control Panel, click on the upper right menu (Settings>> Administration):
10 – Next left menu, locate and click Administration >> ARC/DKIM Registry
11 – With each new domain you host, you must generate a DKIN and adjust the SPF for it. Fill in as follows:
Domain/s : domain referring to the account you just created
Selector : I suggest leaving the default “dekin” (without quotes)
DKIM record size : I like to use 2048 bits
To finish click on ” +Save ” . Note that a private key has been created for DKIM, we will use this key in our DNS provider.
As for SPF, it’s a very important and simple task, so we’ll cover it in the next topic, about configuring DKIM.
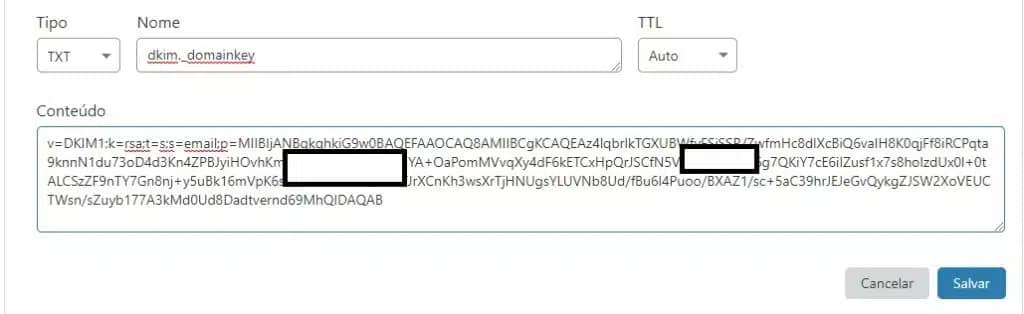
12 – DKIM
Add a TXT entry named dkim._domainkey and in the content field, paste the Prive Key that we generated in the previous step
Enter the SPF

Commenting on latest important features
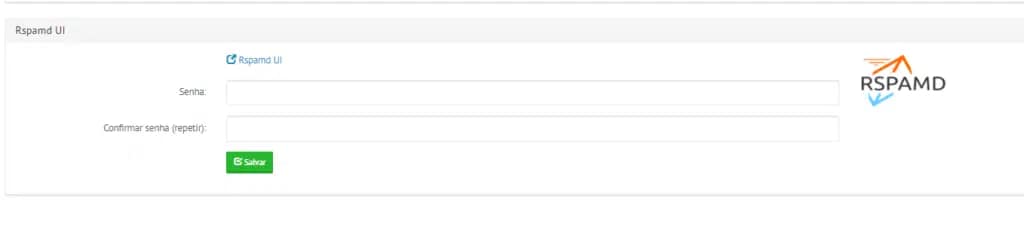
1 – MailCow is fully integrated with Rspamd and has an interface where you can adjust score, filters, view logs, etc. I suggest being very careful with the interface, use very secure passwords and restrict access.
To access the first one we will create a password (very secure).
Access the MailCow Dashboard from the main page, find Rspamd. Modify the password and click the ” Rspamd UI ” link
Be careful with changes to rspamd, symbols, configurations etc.
Do you want to have MailCow/Antivirus, Backups etc, optimized, installed and configured with all our experience and 7 days support? Count on us, we are here!🙂
Hope this post helped you!!! To the next 🙂
See more: How to install Glances to monitor the server
See more: How to install Engintron(NGINX) cPanel/WHM
See more: Finding the number of email accounts on cPanel server
See more: How to install Crowdsec
Veja mais: Como instalar o servidor de e-mail Mailcow
See more: How to Install Portainer for Docker Management with Nginx Proxy Manager on Ubuntu