OpenLiteSpeed is a modern, open-source web server with high-performance features and top-tier security.
The server understands Apache rewrite rules and has intelligent cache acceleration features that allow you to implement faster caching on your server.
It has built-in Multi-PHP support and also LSAPI for external applications that are 2x faster; in addition to all this, it is possible to enable multiple PHP processors for different websites.
Key features of OpenLiteSpeed
- Compatibility with Apache rewrite rules.
- Web Administration Panel.
- Event-driven architecture.
- HTTP/3 & HTTP/2 support.
- Multiple PHP version support.
- Multi-Thread module.
- LiteSpeed Cache.
- WAF (mod_security 3), Anti-DDoS, and Bandwidth limiting.
In this post we will discuss
- UFW Firewall Configuration
- OpenLiteSpeed Installation
- PHP 8.3 and Extensions Installation
- MariaDB 10.4 Installation
- Correct vhost configuration in OpenLiteSpeed to host our first domain
- SSL installation and configuration with Let’s Encrypt on your domain in OpenLiteSpeed
- WordPress Installation
Note: For improved security and excellent performance, SSL will use the new TLS 1.3 and HTTP the new version http/3.
UFW Firewall Configuration
We will use the default Ubuntu 20.04 firewall. We will open the following ports:
Ports: 80 tcp, 443 tcp/udp, 7080/tcp, 22/ssh
UFW is inactive by default.
By default, UFW is configured to deny all incoming connections and only allows outgoing connections, meaning that no external connections would be able to access your server, but your applications would be able to access the external network.
To avoid problems, let’s first create our rules, opening the ports we will use.
ufw allow 80/tcp
ufw allow 443/tcp
ufw allow 443/udp
ufw allow 7080/tcp
ufw allow 22/tcp
Now let’s enable UFW. Type y in the question.
root@helpsysadmin:~# ufw enable
Command may disrupt existing ssh connections. Proceed with operation (y|n)? y
Done! Now we have UFW active and filtering the ports we specified.
OpenLiteSpeed Installation
We will install OpenLiteSpeed from the Repository.
wget -O - http://rpms.litespeedtech.com/debian/enable_lst_debian_repo.sh | bash
Update the repository list and install OpenLiteSpeed.
apt update
apt install openlitespeed -y
After installation, we will change the password. There are two ways to do this.
The first method is to use the OpenLiteSpeed control panel and, with the default username and password (username: admin password: 123456), change your password.
The second method is the one I recommend you at least be aware of. This method is very useful if you ever lose your admin password. Follow the steps below via the shell.
cd /usr/local/lsws/admin/misc
./admpass.sh
In the Username field [admin]: leave blank and press enter. Then enter the desired password twice.
This method is very useful if you ever lose your administrator password.
To access the OpenLiteSpeed administration, use: https://yourserverip:7080
Installing PHP 8.3 and extensions
By default, OpenLiteSpeed installs PHP 8.3.
For educational purposes and improvements, we will install PHP 8.3 and configure it as the default in OpenLiteSpeed.
Install PHP 8.3 and extensions:
apt install -y lsphp83 lsphp83-apcu lsphp83-common lsphp83-curl lsphp83-dbg lsphp83-dev lsphp83-igbinary lsphp83-imagick lsphp83-imap lsphp74-intl lsphp83-ioncube lsphp83-json lsphp83-ldap lsphp83-memcached lsphp83-modules-source lsphp83-msgpack lsphp83-mysql lsphp83-opcache lsphp83-pear lsphp83-pgsql lsphp83-pspell lsphp83-redis lsphp74-snmp lsphp83-sqlite3 lsphp83-sybase lsphp83-tidy
MariaDB 10.4 Installation
Installing the MariaDB 10.4 repository
apt-get install software-properties-common dirmngr apt-transport-https
apt-key adv --fetch-keys 'https://mariadb.org/mariadb_release_signing_key.asc'
add-apt-repository 'deb [arch=amd64,arm64,ppc64el] https://espejito.fder.edu.uy/mariadb/repo/10.4/ubuntu focal main'
MariaDB 10.4 Installation
apt update
apt install mariadb-server
Run the script for MariaDB security.
mysql_secure_installation
Enter current password for root (enter for none): ( PRESSIONE ENTER )
Set root password? [Y/n] Y
New password: Digite a senha desejada para o root do mariadb
Re-enter new password: Digite novamente a senha para o root do mariadb
Remove anonymous users? [Y/n] Y
Disallow root login remotely? [Y/n] Y
Remove test database and access to it? [Y/n] Y
Reload privilege tables now? [Y/n] Y
Enable and start MariaDB.
systemctl enable mariadb
systemctl start mariadb
systemctl status mariadb
Configuring vhosts in OpenLiteSpeed to host our first domain.
In this step, we need a domain that we will point to the IP address of our server. In our example, we are using a domain “helpsysadmin.ml” that uses Cloudflare services.
In your DNS provider, create an A record from your domain name to the IP address of your OpenLiteSpeed server and another CNAME record www for your domain name.

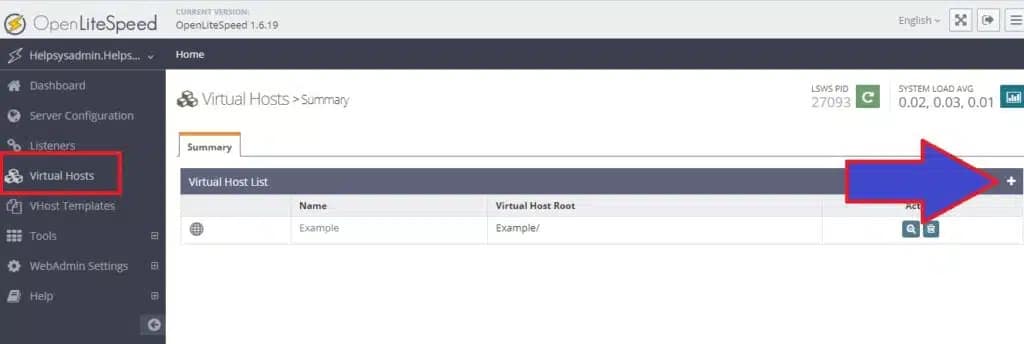
Creating a Virtual Host in OpenLiteSpeed
Access the OpenLiteSpeed administration panel at https://yourserverip:7080, then go to Virtual Hosts and click the Add icon.
Add the configuration below.
| Variables | Value |
| Virtual Host Name | helpsysadmin.ml |
| Virtual Host Root | $SERVER_ROOT/helpsysadmin.ml/ |
| Config File | $SERVER_ROOT/conf/vhosts/$VH_NAME/helpsysadmin.ml.conf |
| Follow Symbolic Link | Yes |
| Enable Scripts/ExtApps | Yes |
| Restrained | Yes |
| ExtApp Set UID Mode | Server UID |
At the top of the page, click “Save”. You will see a message informing you that the .conf file does not exist. Below, there will be an option to create the .conf file; click “CLICK TO CREATE” to then save this part.
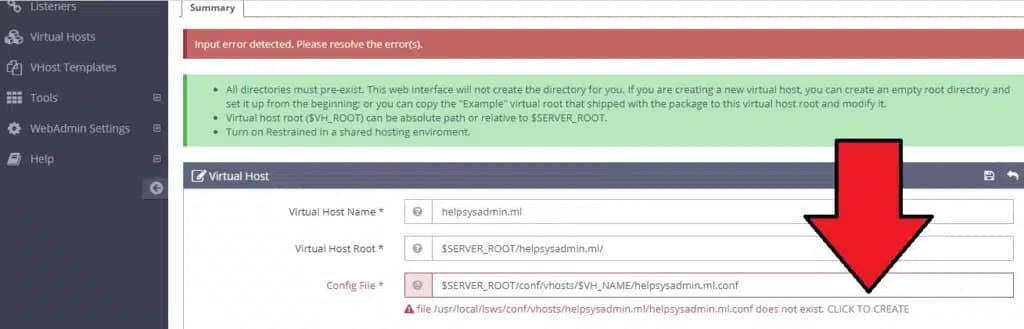
When we click “CLICK TO CREATE,” Openlitespeed creates a virtual host configuration file that allows us to save the settings.
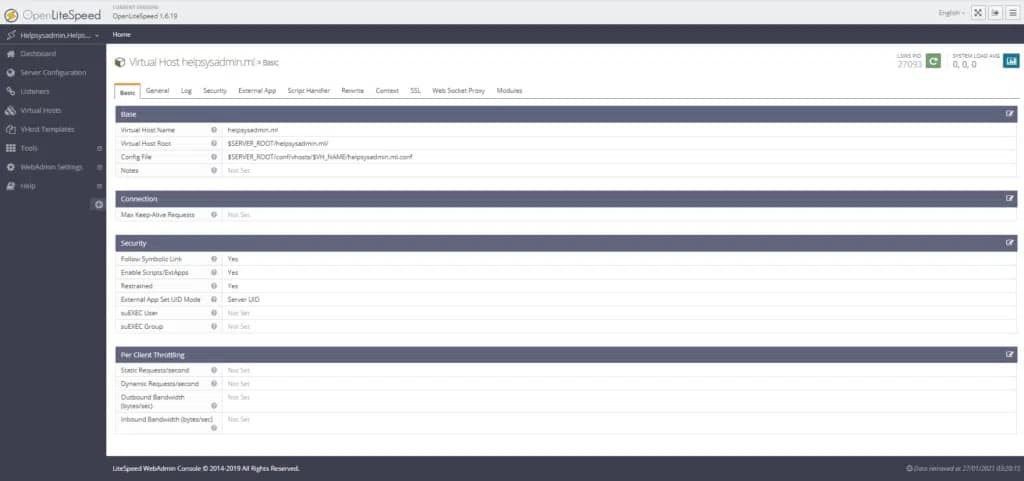
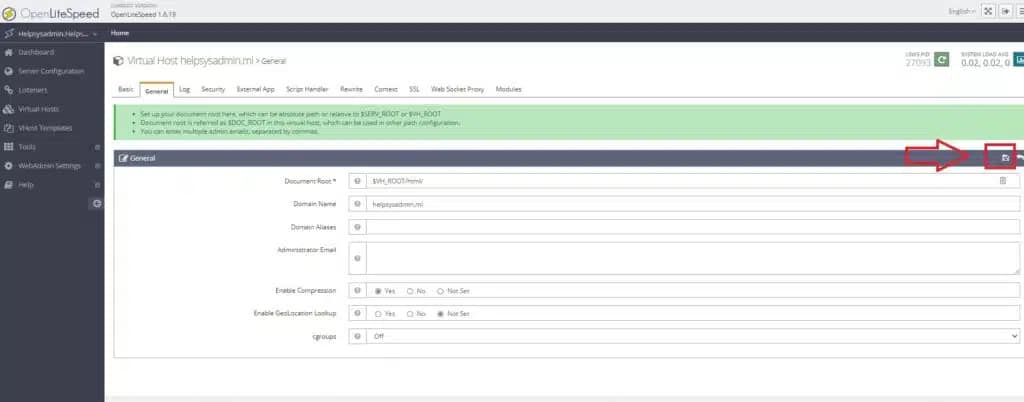
Once our virtual host has been created, go back to Virtual Hosts –> click on the Virtual Host (helpsysadmin.ml) –> select the General tab and modify the settings as shown below.
| Variables | Value |
| Document Root | $VH_ROOT/html/ |
| Domain Name | helpsysadmin.ml |
| Enable Compression | Yes |
Save the changes.
Again, go to Virtual Hosts > click on your Virtual Host (helpsysadmin.ml) –> General and edit Index Files.
| Variables | Value |
| Use Server Index Files | No |
| Index Files | index.html, index.php |
| Auto Index | No |
| Auto Index URI |

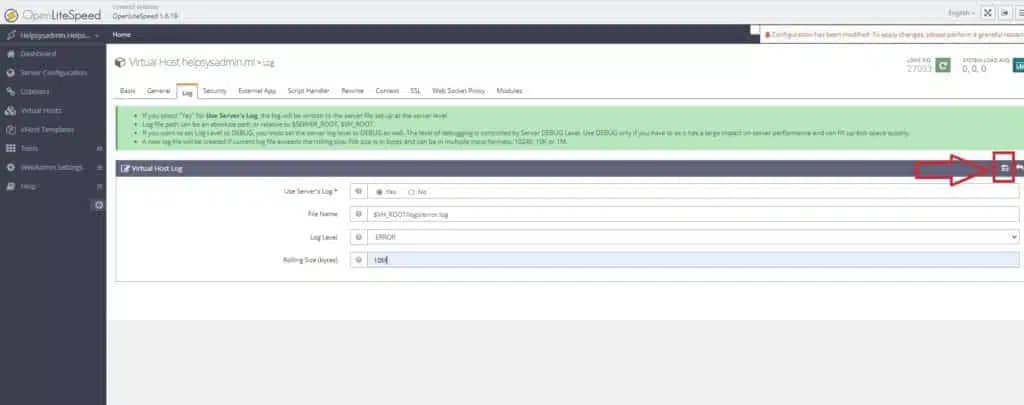
Novamente vá em Virtual Hosts > clique em seu Virtual Host (helpsysadmin.ml) –> Log e edite Virtual Host Log
| Variables | Value |
| Use Server’s Log | Yes |
| File Name | $VH_ROOT/logs/error.log |
| Log Level | ERROR |
| Rolling Size (bytes) | 10M |
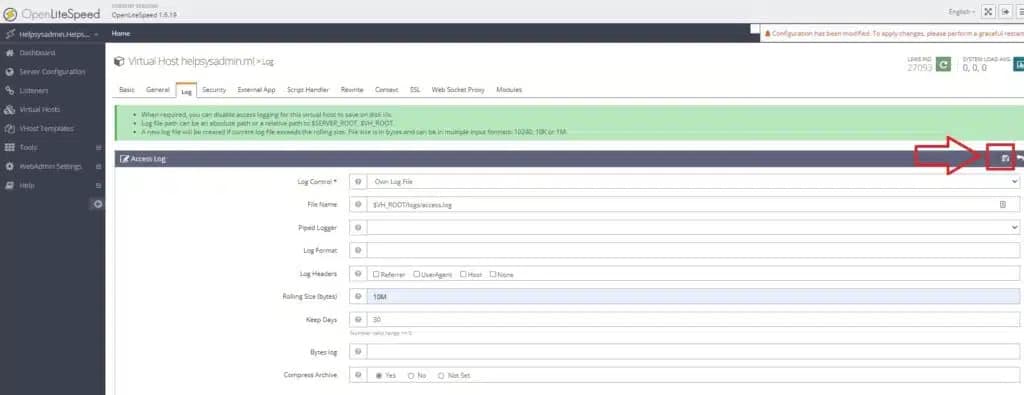
Again, go to Virtual Hosts > click on your Virtual Host (helpsysadmin.ml) –> Log and edit Access Log.
| Variables | Value |
| Log Control | Own Log File |
| Piped Logger | |
| Log Format | |
| Log Headers | |
| Rolling Size (bytes) | 10M |
| Keep Days | 30 |
| Bytes log | |
| Compress Archive | Yes |
After creating a Virtual Host for our domain, we need to map it so that we can access it later.
To do this, go to Listeners, we’ll create two records, one will be responsible for configuring our domain on port 80, the other on the secure port 443.
Locate the “Listener List” menu and on the right click the “+” sign to add our first Listener.
Fill in the fields according to the table.
| Variables | Value |
| Listener Name | Porta80 |
| IP Address | ANY |
| Port | 80 |
| Binding | |
| Secure | No |
| Notes |

Now add a new Listener for port 443 as shown below.
| Variables | Value |
| Listener Name | Porta443 |
| IP Address | ANY |
| Port | 443 |
| Binding | |
| Secure | Yes |
| Notes |
At this point we have the Listeners for ports 80 and 443. Click on the name of one of the Listeners you created, then in “Virtual Host Mappings” click on the “+” sign.

On the next screen, under Virtual Host*, select your domain name and below, under Domains, re-enter your domain name without www or http.

Perform the same steps with the Porta443 Listener that you created previously.
Criando pastas para logs e site
Access your server’s SSH and type (replace the domain shown with the one you configured in OpenLiteSpeed)
mkdir /usr/local/lsws/helpsysadmin.ml/
mkdir /usr/local/lsws/helpsysadmin.ml/{html,logs}
Before we proceed, let’s restart OpenLiteSpeed and install a Let’s Encrypt SSL certificate for the domain.
It’s important that your domain is pointing to your server’s IP address, as we mentioned at the beginning of this post.
Access the control panel and restart OLS.
Access your server’s SSH and install certbot.
apt install certbot -y
Run certbot and answer the questions below, adapting them to your domain.
certbot certonly
How would you like to authenticate with the ACME CA?
- - - - - - - - - - - - - - - - - - - - - - - - - - - - - - - - - - - - - - - -
1: Spin up a temporary webserver (standalone)
2: Place files in webroot directory (webroot)
- - - - - - - - - - - - - - - - - - - - - - - - - - - - - - - - - - - - - - - -
Select the appropriate number [1-2] then [enter] (press 'c' to cancel): 2
Please enter in your domain name(s) (comma and/or space separated)  (Enter 'c'
to cancel): helpsysadmin.ml
Input the webroot for helpsysadmin.ml: /usr/local/lsws/helpsysadmin.ml/html
If everything went well, you will see a message informing you that the Certificate and Key have been created; save this information. We will use it later.
IMPORTANT NOTES:
 - Congratulations! Your certificate and chain have been saved at:
   /etc/letsencrypt/live/helpsysadmin.ml/fullchain.pem
   Your key file has been saved at:
   /etc/letsencrypt/live/helpsysadmin.ml/privkey.pem
   Your cert will expire on 2021-04-27. To obtain a new or tweaked
   version of this certificate in the future, simply run certbot
   again. To non-interactively renew *all* of your certificates, run
   "certbot renew"
 - If you like Certbot, please consider supporting our work by:
   Donating to ISRG / Let's Encrypt:   https://letsencrypt.org/donate
   Donating to EFF:                    https://eff.org/donate-le
Go back to the OpenLiteSpeed dashboard in Virtual Hosts >> helpsysadmin.ml and select the SSL tab.
Edit SSL Private Key and Certificate
Private Key File is the second result when you requested the certificate.
Certificate File is the first result when you requested the certificate.
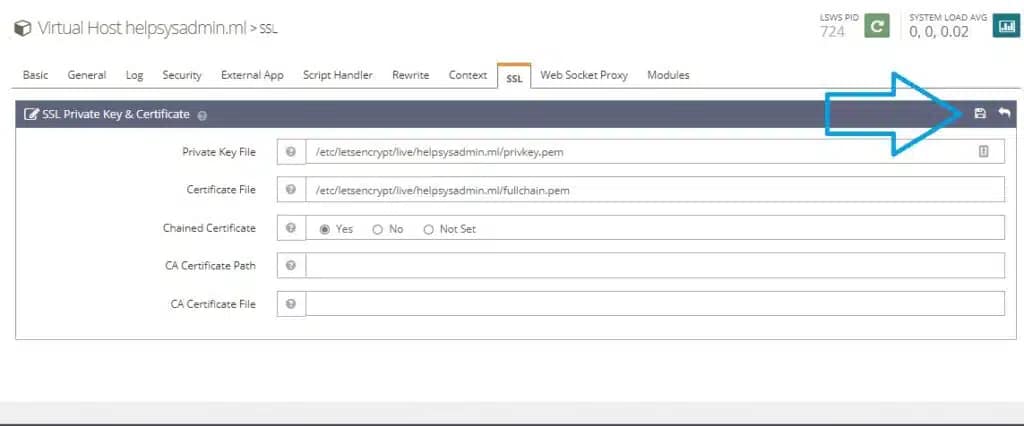
After saving the changes, continue to the SSL tab; we’re going to make some changes and improvements.
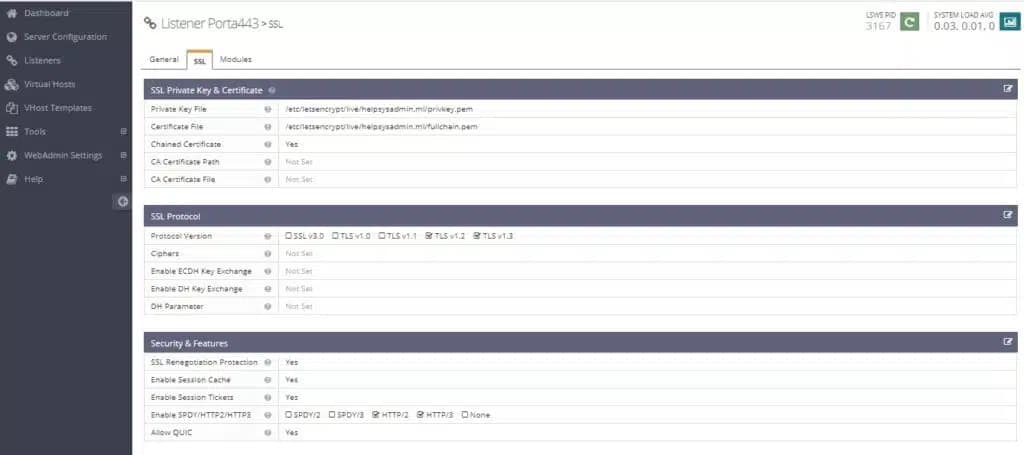
Edit SSL Protocol
| Variable | Value |
| Protocol Version | TLS v1.2 TLS v1.3 |
| Ciphers | |
| Enable ECDH Exchange | |
| Enable DH Key Exchange | |
| DH Parameter |
Edit Security
| Variable | Value |
| SSL Renegotiation ProtectionHTTP/2SSL Renegotiation Protection | Yes |
| Enable Session Cache | Yes |
| Enable Session Tickets | Yes |
| Enable SPDY/HTTP2/HTTP3 | HTTP/3 |
| Enable QUIC | Yes |
Since this is the first domain with an SSL certificate, we will need to repeat these steps in Listeners. Next, click on Port 443 and access the SSL tab.
Fill in the fields exactly as you did in Virtual Hosts previously. Finally, save and restart OpenLiteSpeed from the control panel.
Note: For future domains you host, you will only need to configure the SSL settings in the Virtual Host for that domain.
At this point, if we access our domain using https, we will see a 404 page because we haven’t uploaded any files to our account.
From this point, we could discuss how to install WordPress, because, as I mentioned at the beginning, OpenLiteSpeed installs PHP 8.3 by default with some extensions.
We have already installed PHP 8.3 with important extensions for WordPress; now let’s configure it in OpenLiteSpeed.
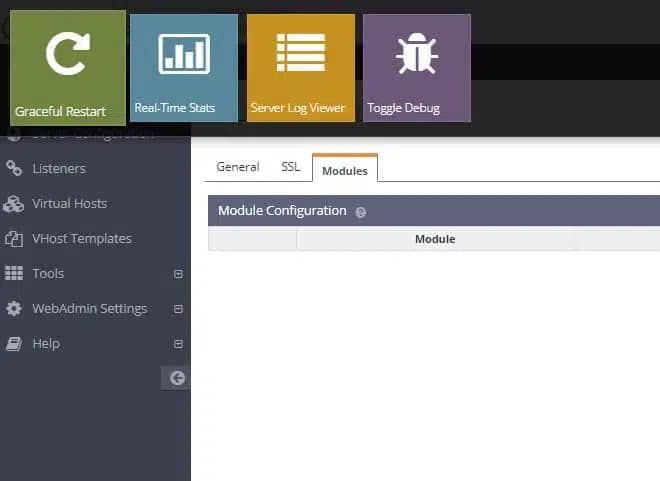
Access the OpenLiteSpeed panel >> Server Configuration,
select External App, and in External Applications click the “+” symbol, then in Type select LiteSpeed SAPI App

Next, click the Next icon.
Fill in the fields according to the table below:
| Variable | Value |
| Name * | lsphp83 |
| Address * | uds://tmp/lshttpd/lsphp83.sock |
| Notes | |
| Max Connections * | 10 |
| Environment | PHP_LSAPI_CHILDREN=10 LSAPI_AVOID_FORK=200M |
| Initial Request Timeout (secs) * | 60 |
| Retry Timeout (secs) * | 0 |
| Persistent Connection | Yes |
| Connection Keep-Alive Timeout | |
| Response Buffering * | No |
| Start By Server * | Yes (Through CGI Daemon) |
| Command | lsphp83/bin/lsphp |
| Back Log | 100 |
| Instances | 1 |
| Run As User | |
| Run As Group | |
| umask | |
| Run On Start Up | |
| Max Idle Time | |
| Priority | 0 |
| Memory Soft Limit (bytes) | 2047M |
| Memory Hard Limit (bytes) | 2047M |
| Process Soft Limit | 1400 |
| Process Hard Limit | 1400 |
Save the changes and click on the “Script Handler” tab. This tab is currently configured to run PHP 8.3. We will make modifications so that our applications now use the PHP 8.3 version we just configured.
In the Actions column, locate and click the “Edit” icon.
In “Handler Name *”, change it to lsphp83, then click “Save” and restart OpenLiteSpeed for the settings to take effect.
The next step is WordPress. Before leaving OpenLiteSpeed, let’s enable .htaccess support, which will be very important in WordPress.
In Server Configuration > General, locate and edit Rewrite Control. Change Auto Load from .htaccess to Yes and save the change.
Now, in the Virtual Host menu, select the record corresponding to your domain.
Locate the “Rewrite” tab and edit “Rewrite Control”.
| Variable | Value |
| Enable Rewrite | Yes |
| Auto Load from .htaccess | Yes |
| Log Level |
Save the changes, then restart OpenLiteSpeed.
Installing WordPress and the Litespeed LS CACHE Plugin
Access your server via SSH as root, then navigate to the directory where your website files will be located. Save the WordPress files there.
cd /usr/local/lsws/helpsysadmin.ml/html/
wget https://br.wordpress.org/latest-pt_BR.tar.gz
tar -xzvf latest-pt_BR.tar.gz
mv wordpress/* .
Creating a database and user for WordPress with MariaDB
Access MariaDB using the root username and password you set when you installed MariaDB above.
mysql -u root -pSENHAROOT
Create the database
CREATE DATABASE wordpress DEFAULT CHARACTER SET utf8 COLLATE utf8_unicode_ci;
Next, we’ll create a user (wordpress_user) with full permissions in this database and set a password. I suggest using a strong username and password. Save this information; we’ll use it later.
GRANT ALL ON wordpress.* TO 'wordpress_user'@'localhost' IDENTIFIED BY 'senha';
We have a database and a user with full access to this database for use in WordPress. Now we need to run the following command to reload the tables and let the current MariaDB instance know about the changes you made:
FLUSH PRIVILEGES;
Now, let’s leave MariaDB.
EXIT;
Go back to the directory where the WordPress files are located, create the .htaccess file, and change the user and group for the files to nobody and nogroup. By default, OpenLiteSpeed runs as “user(nobody) : group(nogroup)”, so these changes are necessary to avoid permission problems.
cd /usr/local/lsws/helpsysadmin.ml/html/
touch .htaccess
chown nobody.nogroup .htaccess
chown -R nobody.nogroup
Access the domain you configured in your web browser.
Example: https://helpsysadmin.ml
You will see a page explaining what comes next in the WordPress configuration. Click “Let’s go”.
On the next page, fill in the name of the database you created, username, and password. Click next.
A message will appear informing you that it was not possible to create the wp-config.php file, and in the box below, the content that this file should have. Copy the content, return to the location of your files, create the wp-config.php file, and paste the previous content. Save the changes and return to configuring your domain in your browser.
cd /usr/local/lsws/helpsysadmin.ml/html
nano wp-config.php
In this section, you will need to enter the admin username, password, and email address. Click “Continue”!
Your WordPress is now installed.
Now I would like to briefly discuss a powerful plugin for OpenLiteSpeed and LiteSpeed users. It’s an excellent plugin with basic and advanced features. I suggest spending some time discovering what works and what doesn’t for your site. Locate the LiteSpeed Cache plugin.
I hope you enjoyed it.
Veja mais: Como instalar o CENTMIN MOD no Almalinux 8
Veja mais: Como instalar Portainer para gerenciamento Docker com Nginx Proxy Manager no Ubuntu
Veja mais: Como instalar o servidor de e-mail Mailcow