RAID 1: A Complete Summary of Disk Mirroring
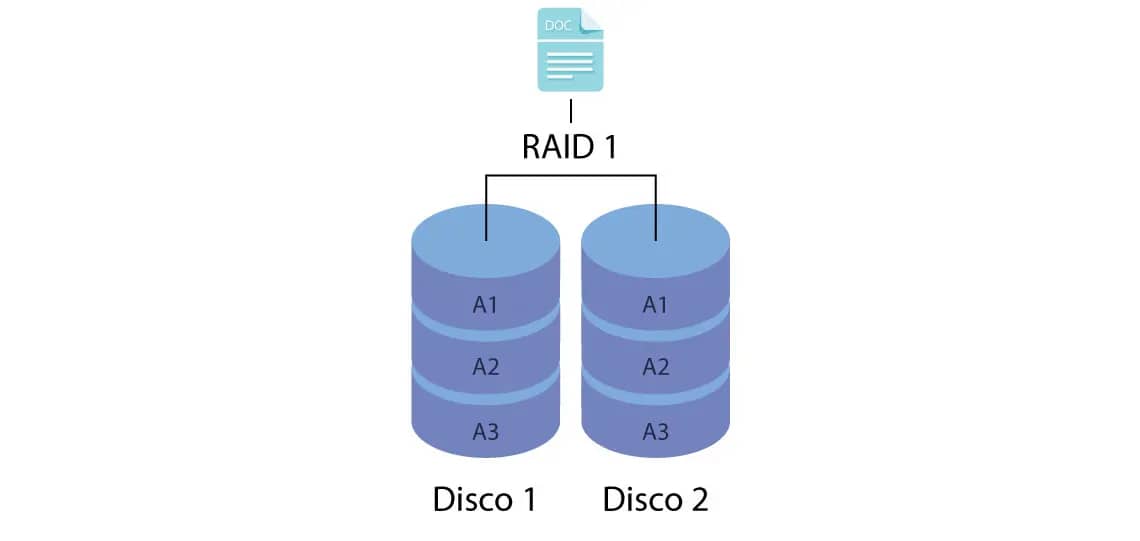
RAID 1, also known as “mirroring,” is a data storage technology that prioritizes redundancy and high availability by duplicating information across two or more hard drives (HDDs or SSDs). In its most common configuration, with two drives, all data written to one drive is simultaneously and identically written to the other, creating an exact copy or “mirror.”
The main purpose of RAID 1 is to ensure data protection against hardware failure. If one disk in the array fails, the system continues operating normally using the mirrored disk, without data loss or interruption in access. This makes RAID 1 a popular choice for systems that require high reliability and continuous uptime.
How to Configure Raid 1 on Linux Systems: A Complete Guide
Setting up a RAID 1 array (mirroring) on Linux systems is an effective way to ensure data redundancy and increase system fault tolerance. This detailed guide will provide a step-by-step guide to setting up a software RAID 1 using the tool mdadm, the standard RAID management utility in Linux.
Prerequisites
Before you begin, make sure you have:
- Two or more hard drives, preferably the same size. If the drives are different sizes, the array will be the size of the smallest drive.
- The utility
mdadmis installed. Most modern Linux distributions already include it. If not, it can be installed through your distribution’s package manager.
Step by Step Guide to Configuring RAID 1
1. Installation of mdadm
If it mdadmis not installed, use the appropriate command for your distribution:
- For Debian/Ubuntu based distributions:
sudo apt-get update
sudo apt-get install mdadm
- For Red Hat/Almalinux/Fedora based distributions:
sudo dnf install mdadm
2. Identifying and Partitioning Disks
First, identify the disks that will be used in the RAID array. Use the lsblkor command fdisk -lto list the available disks. Assume the disks to be used are /dev/sdband /dev/sdc.
Warning: The following steps will erase all data on the selected drives. Back up any important data.
Now, we need to create partitions on the disks that will be designated for RAID. We’ll use the following fdiskfor this example:
Open the utility fdiskfor the first disk:
sudo fdisk /dev/sdb
- Inside
fdisk, follow these steps:- Enter
nto create a new partition. - Press
pto create a primary partition. - Press
1to select the partition number. - Press
Entertwice to accept the default values for the first and last sector, using the entire disk. - Enter
tto change the partition type. - Type
fd(Linux raid autodetect) to set the partition type to RAID. - Enter
wto save changes and exit.
- Enter
Repeat the same process for the second disk ( /dev/sdc). When finished, you’ll have the partitions /dev/sdb1ready /dev/sdc1to be used in the RAID array.
3. Creating a RAID 1 Array
With the partitions ready, use the command mdadmto create the RAID device. In this example, we’ll create a device named /dev/md0:
sudo mdadm --create --verbose /dev/md0 --level=1 --raid-devices=2 /dev/sdb1 /dev/sdc1
Let’s understand the parameters:
--create /dev/md0: Creates a new RAID device named/dev/md0.--verbose: Displays detailed information during the creation process.--level=1: Specifies the RAID level, in this case, RAID 1 (mirroring).--raid-devices=2: Sets the number of devices in the array./dev/sdb1 /dev/sdc1: The partitions that will be part of the RAID array.
4. Verifying the RAID Array
After creation, it’s crucial to check the status of the array. The disk synchronization process will begin. You can monitor the progress with the following command:
cat /proc/mdstat
The output will show the progress of the rebuild (resync). Wait until the sync is 100% complete.
For full arrangement details, use:
sudo mdadm --detail /dev/md0
5. Creating a File System
With the RAID array created and synchronized, the next step is to format it with a file system. We’ll use the following ext4 as an example:
sudo mkfs.ext4 /dev/md0
6. Mounting the RAID Device
Now, let’s mount the RAID device so the system can use it. Create a mount point and then mount the device:
sudo mkdir -p /mnt/raid1
sudo mount /dev/md0 /mnt/raid1
Verify that the device was mounted correctly with the command df -h.
7. Making the RAID Array Persistent
To ensure that the RAID array is automatically assembled after each reboot, two configurations need to be made
First, save the RAID configuration to the configuration file mdadm:
sudo mdadm --detail --scan | sudo tee -a /etc/mdadm/mdadm.conf
Then add an entry to the file /etc/fstab to mount the device at boot. Get the device’s UUID with the command blkid:
sudo blkid /dev/md0
Copy the value of UUIDand add the following line to the end of the file /etc/fstab(replace SEU_UUID_AQUIwith the copied UUID):
UUID=YOUR_UUID_HERE /mnt/raid1 ext4 defaults 0 0
Salve e feche o arquivo.
Conclusion
By following these steps, you’ll have successfully configured a RAID 1 array on your Linux system, providing an essential layer of data protection through disk mirroring. Remember to regularly monitor the health of your RAID array to ensure its integrity and functionality.