


CENTMIN MOD is basically a set of programs and tools for building your WebServer.
Some CentMin MOD software
Nginx
MariaDB
Memcached
Redis
CSF Firewall
and many others….
But make no mistake, Centmin MOD is not just another project compiled with various tools, it goes much further than that.
It has very well-written code and addresses deep server issues such as MariaDB optimization, kernel module configuration via sysctl.conf, changes to the SSH configuration file, excellent NGINX optimization, PHP-FPM and so on…
It is undoubtedly a project of excellence, focused on performance optimization and includes an advanced WordPress installer.
All this is organized in an easy-to-use menu in the server shell.
There are two ways to install.
The first would be to install the basics and not know how to add any of the dozens of features available.
The second is the one we’re going to use, using a custom_config.inc file to add important features.
For reference, the complete file with all the functions can be found by clicking here .
Tip: Centmin MOD analyzes the server being installed and tries to optimize it as much as possible. I suggest that you update the conform kernel before you starte in post How to install Linux Kernel 6.x on AlmaLinux 8
Pointing domain to server
For this article you will need a domain and access to creating DNS entries.
- Create a DNS entry of type A pointing the domain to the ip of the server
- Create a DNS entry of type CNAME pointing www to your domain name


Installing Centmin MOD
Access your server’s ssh as root and use your favorite editor. In this post we’ll install and use nano
Store your email address in a variable, then create the location where we will save the configuration file and edit the new custom_config.inc file.
Copy and paste the content below into your custom_config.inc file.
Installing Centmin MOD with php 8.2
Note that at the end of the installation, important information will be displayed that you should keep.
Examples:
Password-protected pages with information:
Memcached Server Admin Login:
PHP Info
Opcache Server Admin Login:
In addition to the MariaDB root password.
Next, we’ll pre-create the HTTPS Nginx site’s dhparam file to speed up the subsequent Nginx vhost creation routines. On slow systems, this command will take a few minutes to complete.
Running the Centmin MOD menu and creating an optimized WordPress vhost.
To view the Centmin MOD Menu, type centmin. The first time it asks you to enter a primary and secondary email address.
Wait for the settings to finish.
Centmin MOD menu

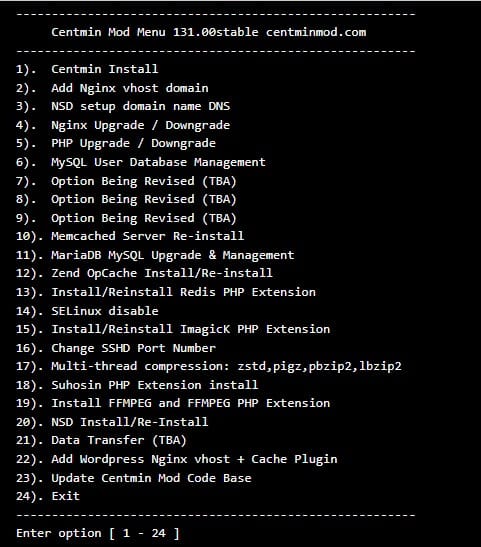
Centmin MOD menu
Enter the number 22 to create our WordPress account
Type Y for a question
Do you want to continue creating the Nginx vhost site? [y/n]
Enter the name of your domain, which already uses the IP of the server as we saw at the beginning
Enter the name of the vhost domain you want to add (without the www. prefix): helpsysadmin.ml
Enter N for the question below
Create a self-signed SSL certificate Nginx vhost? [y/n]:
Type Y for the next question
Get Letsencrypt SSL certificate Nginx vhost? [y/n]:
In the next question type 4
You have four options:
issue readiness test certificate with HTTP + HTTPS (untrusted)
issue readiness test certificate with standard HTTPS (untrusted)
issue an active certificate with HTTP + HTTPS (trusted)
issue active certificate with standard HTTPS (trusted)
Type N for
Install the CyberChimps responsive theme (cyberchimps.com/responsive-theme/) [y/n]:
Type N for
Not a fan of the Gutenberg Editor? You can switch to the Classic Editor
If you have problems with the Gutenberg Editor, you can later switch to
the Classic Editor https://wordpress.org/plugins/classic-editor/
Install the Classic Editor plug-in for WordPress? [y/n]:
Type Y for
The Autoptimize WP plug-in is installed by default. Do you want to install
the Autoptimize Gzip plug-in to precompress optimized js/css files
Details at https://community.centminmod.com/threads/15314/
Install the Autoptimize Gzip Companion WordPress plug-in ? [y/n]:
Type Y for
Google’s native LazyLoad plug-in https://wordpress.org/plugins/native-lazyload/
Install the native Google LazyLoad plug-in ? [y/n]:
Type N for
Set custom display name for WP admin ? [y/n]:
Type N for
Install WordPress in the /blog subdirectory ? [y/n]:
The next one is up to you. If you type Y, you will be able to create the username and password for the WordPress admin user. If you type N, a very secure username and password will be created.
Disable automatically generated WP admin username/password ? [y/n]:
If you type N , in addition to the wordpress admin password, a username and password will be created to access wp-login.php . For educational purposes, let’s choose to disable this feature, answer Y
Disable password protection for wp-login.php ? (less security) [y/n]:
You will be asked to create a username and password and an e-mail address for WordPress
You will be asked to create a username and password and an e-mail address for WordPress
Enter the username of the desired WP administrator: helpsysadmin
Enter the desired WP administrator password: minhasenhasegura
Enter the e-mail address of the administrator user for the WordPress installation: seuemail@helpsysadmin.ml
You will then be asked to choose which caching plugin you want installed on your server. In this post we’re going to use “KeyCDN Cache Enabler”, enter 1
WordPress Caching
1) KeyCDN Cache Enabler
2) Redis Nginx Level Caching
3) WordPress Super Cache
Create your ftp user
Create FTP username for vhost domain (enter username):
If you choose Y a secure password will be generated for your ftp user
Do you want to auto generate FTP password (recommended) [y/n]:
Setup WordPress + Cache Enabler for helpsysadmin.ml
You will be asked the following question
Using the full static page cache can cause problems for mobile and tablet visitors, depending on the WP theme you use, so you may want to exclude them.
Type Y
That’s it, WordPress has been installed and if all went well it is now accessible with https. Notice in the terminal just before finishing the setup that you have entered your users and passwords.
To finish the setup, you will be asked to make some settings in the WordPress administration.
To make things easier, I’ll translate here what you need to configure.
WP is in English, but you can change this in Menu >> Settings . Under Site Language change it to Brazilian Portuguese and at the bottom of the page click on the Save button.
To complete the setup:
1 – Under Settings >> Enable permalinks (DO NOT use links with .html extensions for performance reasons) Example: /%post_id%/%postname%/
I suggest you use something like the example:
https://helpsysadmin.ml/post-exemplo/
2 – Go to Settings >> Cache Enabler . In my opinion, no modification is necessary.
3 – Go to Settings >> Autoptimize . I suggest you enable the options and test whether this will affect your theme.
The performance gain from optimizing Javascript and CSS is quite significant, but in some cases it may affect the installed theme.
Remember that Centmin MOD has tried to optimize your server and the applications involved as much as possible. Obviously, it hasn’t analyzed logs, the number of average requests to the server and the use of resources, which is essential to achieve the best possible performance. In the Server Optimization for WordPress plan we offer advanced optimizations to achieve the best server performance and security.
I hope you enjoyed this post.